Android Jetpack 套件之 Dagger2 使用;
什么是依赖注入?
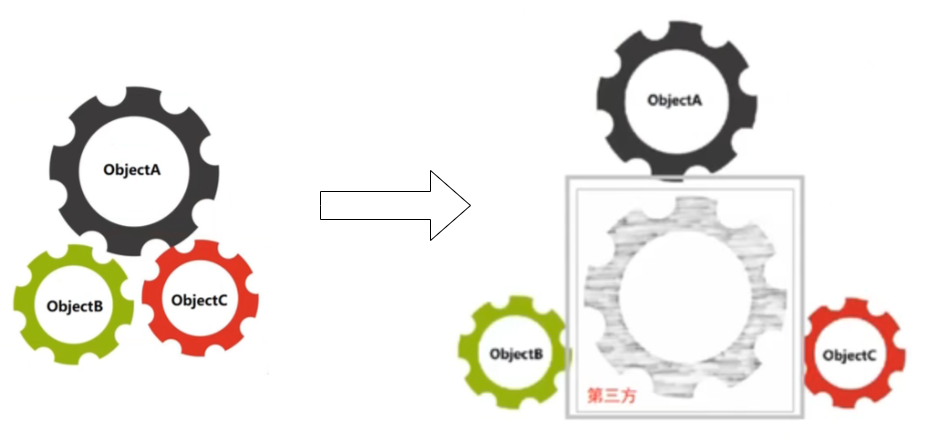
IOC - Inversion of Control
控制反转,意思是借助于“第三方” 实现 具有依赖关系的 对象之间的解耦(比如在三个互相接触的小齿轮中间增加一个大的齿轮来接触三个小齿轮,以解除三个小齿轮之间的互相依赖);
反转的是对象的创建方式,即获得依赖对象的过程被反转了,获得依赖对象的过程 由自身管理变为了由IOC 容器主动注入,于是 IOC 有了一个新名字:依赖注入,实际上“依赖注入” IOC 的一种实现方式,IOC 框架有两种实现方式:
- 基于反射的实现方式,比如 Spring IOC(动态的进行依赖关系的建立),在程序运行过程中动态的建立依赖关系;
- 静态方式,程序在编译期自动生成代码用于建立依赖关系,dagger2 就属于静态方式;
手动依赖注入的两种方式
- 构造方法注入
- Setter 方法注入(setXXX 方法)
1 | public class Car { |
主动控制对象的创建,如果 Engine 的构造方法发生了变化,那么 Car 类中也要做出相应的改变,但是如果通过依赖注入,Car 类就不需要再关注 Engine 对象的创建,只关注自己的业务就可以了;
试想一下,Car 不单单只有 Engine,还包括其他的零部件,比如 Wheel,Gearbox 等,Engine 又包含了自己的零部件,这么多的对象如果通过手动依赖注入就需要大量的调用构造方法或者 Setter 方法进行注入,变得异常繁琐,所以我们需要一个工具可以帮我们注入:
1 | public class Injector { |
在外部直接调用 inject 方法即可注入依赖对象了;
什么是 Dagger?
Dagger(匕首) 是提供给 Android 快速实现依赖注入的框架,Dagger1.0 由 Square 公司开发共享,Dagger2 由 Google 接手并维护;
Dagger 使用
首先添加依赖引入 Dagger2:
1 | // build.gradle(:app) |
使用构造方法创建对象
- 定义对象
1 | public class User { |
@Inject 注解用于告知 Dagger 可以通过构造方法创建并获取对象实例;
- 编写 Component 接口用于执行注入
1 |
|
Component 可以当成 IOC 容器,IOC 容器则存在一些实例,inject() 方法参数表示把对象注入到 MainActivity 中(或者说这个 Component 中的对象会在哪个类使用);
- 定义依赖对象
1 | public class MainActivity extends AppCompatActivity { |
@Inject 表示这个依赖对象需要注入;
- 执行依赖对象注入
1 | public class MainActivity extends AppCompatActivity { |
要执行 build 后才会生成 DaggerAppComponent,DaggerAppComponent 是 AppComponent 的实现类,调用 AppComponet 中定义的方法执行注入动作;
通过以上 4 个步骤就完成了一个对象的注入;
但是如果有些对象的构造是第三方框架提供的,就无法在构造方法上添加 @Inject 注解了,又或者提供依赖的构造函数是带参数的,如果只是简单的使用 @Inject 标记,那么它的参数又如何来的呢?@Module 刻意帮我们解决这些问题;
使用 Module 的 provideXXX() 创建对象
定义 Module
Module 的作用是提供各种功能对象
1
2
3
4
5
6
7
8
9
10
11
12
public class NetModule() {
public User provideUser() {
return new User(); // 或者其他提供对象的方式
}
public Retrofit provideRetrofit() {
return new Retrofit.Builder("http://www.baidu.com").basUrl().build();
}
}@Module表示这个类的类型是一个 Dagger 模块,可以注入到容器中;@Provides表示告知 Dagger 可以通过下面这种方式来获取到要注入对象的实例;把 Module 装载到 Component 中
1
2
3
4
public interface AppComponent {
void inject(MainActivity mainActivity);
}在
@Component注解后面括号里把 Module 装载到 Component 中,modules 参数接收的类型是一个数组,表示被装入 Component 的 Module 有哪些,如果是多个 module,则写为modules = {A.class,B.class};执行注入
1
2
3
4
5
6
7
8
9
10
11
12
13
14public class MainActivity extends AppCompatActivity {
User user;
Retrofit retrofit;
protected void onCreate(Bundle savedInstanceState) {
super.onCreate(savedInstanceState);
setContentView(R.layout.activity_main);
DaggerAppComponent.create().inject(this); // 执行注入
Log.d(TAG, "user: " + user + ", retrofit: " + retrofit);
}
}复杂情况使用(引用 Module 中已知的对象)
创建一个 ApiService 接口
1
public interface ApiService {}
假如获取 ApiService 对象需要使用到 Retrofit 对象,则直接在参数中引入 Retrofit 对象即可,因为 Module 已经知道如何获取 Module 对象了,所以不需要再重复调用创建 Retrofit 的方法了;
1
2
3
4
5
6
7
8
9
10
11
12
13
14
public class NetModule() {
public Retrofit provideRetrofit() {
return new Retrofit.Builder("http://www.baidu.com").basUrl().build();
}
public ApiService provideApiService(Retrofit retrofit){
// 一般使用
//new Retrofit.Builder("http://www.baidu.com").basUrl().build().create(ApiService.class);
retrofit.create(ApiService.class);
}
}此处想说明的就是如果 Module 中已经知道如何获取一个对象,那么 Module 中的其他对象的创建方法中可以直接使用这个对象;
作用域
局部单例
作用域注解可以将某个对象的生命周期限定为其组件的生命周期(即如果 Module 中的获取实例的方法指定了某个作用域,那么对应的 Component 也需要指定这个作用域),在作用域范围内使用到的是同一实例;
作用域就算用来管理 Component 来获取对象实例的生命周期的;
1 |
|
@Singleton 是 Dagger 提供的一种默认的作用域注解;
1 |
|
装载 Module 的 Component 也需要添加 @Singleton 注解;
1 | public class MainActivity extends AppCompatActivity { |
如果打印出来就可以看出 retrofit 和 retrofit2 是同一个对象;
但是假如有另一个 Activity,同样注入了 Retrofit 对象,那么和上面是否是同一个实例呢?
1 | public class SecondActivity extends AppCompatActivity { |
把依赖对象注入到 SecondActivity 共其使用:
1 |
|
这里打印出的结果表明 SecondActivity 中的 retrofit3 和 MainActivity 中的两个 Retrofit 对象并非同一个对象,因为在 SecondActivity 中又通过 DaggerAppComponent.create() 创建了一个新的 Component 对象,上面说了,只有同一个 Component 中的对象才是同一个,所以这里就和 MainActivity 中的对象不是同一个了;
全局单例
1 | public class MyApplication extends Application { |
在 Activity 中使用 Application 中提供的 AppComponent 进行对象注入:
1 | public class MainActivity extends AppCompatActivity { |
同理 SecondActivity 中也是用同样的方法注入,这样 MainActivity 和 SecondActivity 中的 Retrofit 对象就是同一个对象了,因为使用的是同一个 Component 注入的;
自定义作用域
1 |
|
直接复制 Singleton 的注解,修改为自定义的作用域名称即可;
使用作用域的规则
- 在没有必要的情况下,尽量使用默认的作用域,即不指定作用域;
- Module 中要么不使用作用域,要么和 Component 中的作用域保持一致;
- 开发设计时,一定要有清晰的依赖图,不然容易产生依赖死循环;
Lazy 和 Provider 区别:Lazy 是单例(使用 DoubleCheck),Provider 不是单例;
组件依赖和子组件
组件依赖与子组件主要解决不同作用域时组件之间的复用问题:
- 在一个组件指定作用域后,就已经确定了该组件创建对象的生命周期,但是有些对象的实例可能生命周期更短,这时就需要定义新的组件;
- 新组件需要使用原组件的部分资源;
两种实现方式:
- 为新组件
@Component添加dependencies参数,指定该组件依赖的原组件; - 直接使用
@Subcomponent注解创建新的组件,并装载到父组件中;
dependencies 方式
定义新组件的作用域:
1
2
3
4
5
6
public UserScope {
}定义新组件
1
2
3
4
5
public interface UserComponent {
void inject(MainActivity mainActivity);
}多个 component 上面的 scope 不能相同,没有 scope 的组件不能去依赖有 scope 的组件,新组件 UserComponent 依赖原组件 AppComponent 组件,所以 指定新组件的作用域 UserScope,如果不给新组建指定作用域,会报如下错误:
1
UserComponent(unscoped) cannot depend on scoped components
因为原组件指定了作用域,所以 新组件需要指定一个不同的作用域,并且对应的 Module 中的 provideXXX() 也需要指定作用域;
原组件中对应需要注入对象的 Activity 的 inject 就不需要了,并且暴露原组件装载的 NetModule 中想要给新组件使用的对象 Retrofit;
1
2
3
4
5
6
public interface AppComponent {
//void inject(MainActivity mainActivity);
Retrofit getRetrofit(); // 暴露需要给新组建使用的对象
}User 对象
1
2
3
4
5
6
7
8
9
10
11
12
13
14public class User {
//@Inject
public User() {
}
}
// 创建 UserModule
public class UserModule() {
// 指定作用域
public User provideUser() {
return new User();
}
}因为使用 UserModule 提供 User 对象了,所以 User 的构造方法不需要添加
@Inject注解了;注入对象
1
2
3
4
5
6
7
8
9
10
11
12
13
14
15
16
17
18
19public class MainActivity extends AppCompatActivity {
User user;
User user2;
Retrofit retrofit;
UserComponent userComponent;
protected void onCreate(Bundle savedInstanceState) {
super.onCreate(savedInstanceState);
setContentView(R.layout.activity_main);
userComponent = DaggerUserComponent.builder
.appComponent(MyApplication.getAppComponent()) // 指定原组件
.build();
userComponent.inject(this);// 执行注入
}
}因为 UserComponent 的生命周期决定了和它同作用域对象的生命周期,所以需要把 UserComponent 定义在 Activity 的变量中,这样那些对象就和 Activity 的生命周期一致了,必须指定原组件;
如此一来 user 和 user2 引用的就是同一个对象了,局部单例,而且原组件装载 Module 中的 Retrofit 对象也注入了;
引入 ApplicationContext
1
2
3
4
5
6
7
8
9
10
11
public class NetModule {
private Application application;
public NetModule(Application application) {
this.application = application;
}
Context provideContext() {
return application.getApplicationContext();
}
}application 需要通过 NetModule 构造方法传入,
1
2
3
4
5
6
7
8
9
10
11public class MyApplication extends Application {
static AppComponent appComponent;
public void onCreate() {
super.onCreate();
appComponent = DaggerAppComponent.builder.netModule(new NetModule(this)).build();
}
public AppComponent getAppComponent() {
return appComponent;
}
}这里在
onCreate()中指定一个新的 NetModule 给 AppComponent,并且把 Application 传入构造函数,这样 NetModule 就拥有了 Application 对象;接着在 MainActivity 中注入 Context:
1
2
3
4
5
6
7
8
9
10
11
12
13
14public class MainActivity extends AppCompatActivity {
Context context;
protected void onCreate(Bundle savedInstanceState) {
super.onCreate(savedInstanceState);
setContentView(R.layout.activity_main);
userComponent = DaggerUserComponent.builder
.appComponent(MyApplication.getAppComponent()) // 指定原组件
.build();
userComponent.inject(this);// 执行注入
}
}Context 是由 NetModule 提供的,NetModule 是属于 AppComponent 的,所以 AppComponent 可以暴露 Context 对象给到依赖 AppComponent 的新组件中,这样就复用了原组件的 ApplicationContext;
SubComponent 使用
创建 Student 类:
1
2
3public class Student {
}创建 StudentComponent
1
2
3
4
5
6
7
8// 指定为子组件
public interface StudentComponent {
.Factory
interface Factory { // 用来提供 StudentComponent 的创建
StudentComponent create();
}
void inject(SecondActivity);
}@Subcomponent说明该组件为子组件;创建子组件 Module
1
2
3
4// 指定子组件
public class SubComponentModule {
}把子组件 Module 装载到 AppComponent 中:
1
2
3
4
5
public interface AppComponent {
StudenComponent.Factory studentComponent(); // 指定 Factory
}那么子组件就属于父组件 AppComponent 了,那么 就可以共享父组件提供的一些功能;
创建 StudentModule,并装载到 StudentComponent 中:
1
2
3
4
5
6
7
public class StudentModule {
Student provideStudent() {
return new Student();
}
}注入
1
2
3
4
5
6
7
8
9
10public class SecondActivity extends AppCompatActivity {
Student student;
protected void onCreate( Bundle savedInstanceState) {
super.onCreate(savedInstanceState);
MyApplication.getApplicationComponent().studentComponent().create().inject(this);
Log.d(TAG, "student: " + student);
}
}总结就是:
父 Component 装载父 Module,父 Module 创建子 Componet(在父 Module 中指定 subcomponents 为子 Component),子Componet 装载子 Module,子 Module 创建XXX对象,然后父 Component 提供获取子 Component 的方法,子 Component 提供 inject 方法;
需要注意的是,子 Componet 没有单独的 Dagger 子 Component,而是存在于 Dagger 父 Component 中,所以注入的时候使用
Dagger父Component.子Component().create().inject(this)的方式;
和组件依赖相比,子组件如果使用父组件的功能,父组件不需要额外声明想要暴露的方法;
@Binds 使用
1 | public abstract class TestModule { |
@Binds 表示告诉 Dagger 此方法可以返回 AInterface 对象,但是具体的创建是由其实现类 AInterfaceImpl01 完成的;
把 TestModule 装载到 AppComponent 中:
1 |
|
注入接口
1 |
|
这里可以直接注入一个依赖接口,如果不使用 @Binds,则只能注入一个依赖对象;
因为 TestModule 属于 AppComponent 组件,这里直接使用 AppComponent 的子组件来注入,可以直接用到父组件装载的 TestModule 中的对象;
Qualifier 注解使用
如果一个类存在多个构造方法,如何注入对象呢?首先可以使用 @Named 注解;
@Named 注解
1 |
|
Student 类有 2 个构造方法:
1 | public class Student { |
定义 StudenModule,用 @Named("XXX") 注解标识对象不同的创建方法:
1 |
|
注入时加上对应的 @Named 注解即可:
1 |
|
这样 student1 的名字就是 Xiaohong,student2 的名字就是 Xiaoming;
我们也可以模仿 @Named 注解定义我们自己的注解,比如:
1 |
|
这样直接用 StudentQualifier1 或者 StudentQualifier2 代替 @Named("xxx") 即可;
总结
Dagger 比较重要的就是作用域、组件依赖和子组件,下一篇分析 Dagger 的实现原理;